
Why I Built My Own “Weekly Meal Planner Template” in Google Sheets (And How It Saves Me Money)
- VR Team
- January 18, 2026
The biggest lie in the productivity space is that “Meal Planning” is a creative habit. It isn’t. It is a logistics problem.
Most people fail at consistent meal prep not because they lack discipline, but because they are using the wrong tools for the job. They treat a grocery list like a scratchpad—a temporary piece of paper (or a static Apple Note) that gets deleted every week. This is an incredible waste of data.
When you use a static tool, you are forced to start from zero every single Sunday. You have to recall what you like to eat, guess what ingredients you need, and mentally calculate if you can afford it. That cognitive load is what causes “decision fatigue“, leading to takeout orders and blown budgets.
If you want to solve the dinner problem permanently, you don’t need a calendar. You need a weekly meal planner template built on Relational Database.
I designed a custom weekly meal planner template in Google Sheets that functions less like a to-do list and more like a minimalist ERP (Enterprise Resource Planning) system for a home kitchen.
Here is the architectural breakdown of how it works, why it saves money, and how the automation handles the boring parts.
The Philosophy: Static Lists vs. Dynamic Databases
Before looking at the tabs, we have to understand the logic. In a standard app, “Chicken” is just a text string. It has no properties. In this system, “Chicken” is a data entity. It has a Price, a Category (Meat), and a Unit (kg/lb).
Because we are treating food as data, we can do things that paper lists can’t:
- Auto-Calculation: We can sum the total cost of a meal before we buy it.
- Aggregation: We can combine “300g of Chicken” from Tuesday and “500g of Chicken” from Thursday into a single line item on the shopping list.
- Analytics: We can see a pie chart of where our money is actually going.
This system is designed to eliminate “Redundant Data Entry.” You should never have to type the price of milk twice.
Phase 1: The "Backend" (The Libraries)
A robust system relies on standardized data. The problem with a standard weekly meal planner template is that it allows for messy data. If you sometimes type “Eggs” and other times type “Egg (12pk)”, the automation breaks because the computer sees two different items. To fix this, I separated the “Data Entry” from the “Planning.”
Tab 1: The Dish Library (“My Dish Library”)
This is the central repository. Think of this as the “Menu” for your personal restaurant. You only enter data here once.
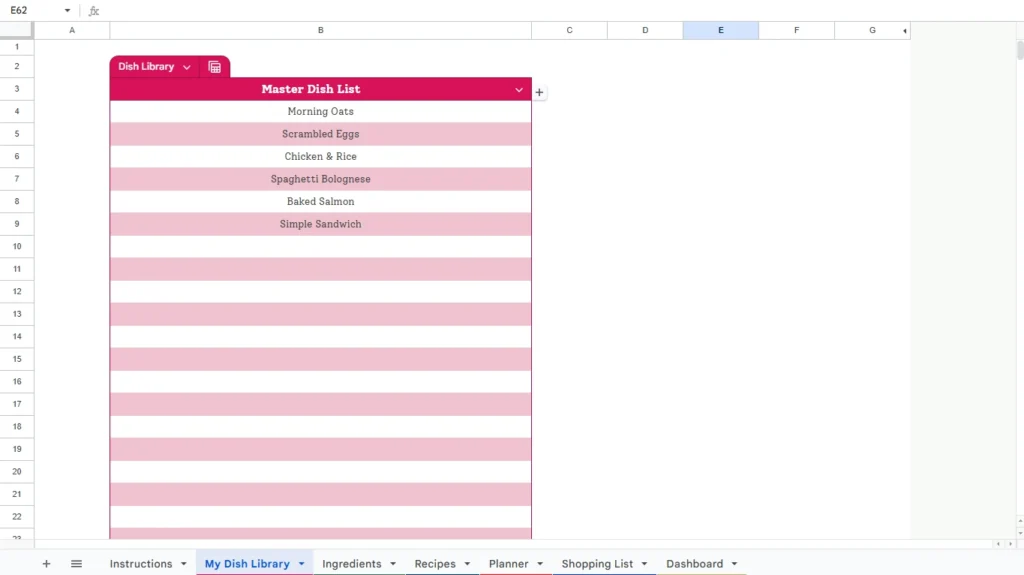
The purpose of this tab is to create a controlled environment. By listing every meal you cook (e.g., “Morning Oats,” “Chicken & Rice”), you create a dropdown source for the rest of the spreadsheet. This prevents spelling errors and ensures that when you select a meal later, the weekly meal planner template knows exactly what you are talking about.
Tab 2: The Ingredient Database (“Ingredients”)
This is where the financial magic happens. Most people don’t know why their grocery bill is high because they don’t track the unit cost of ingredients.
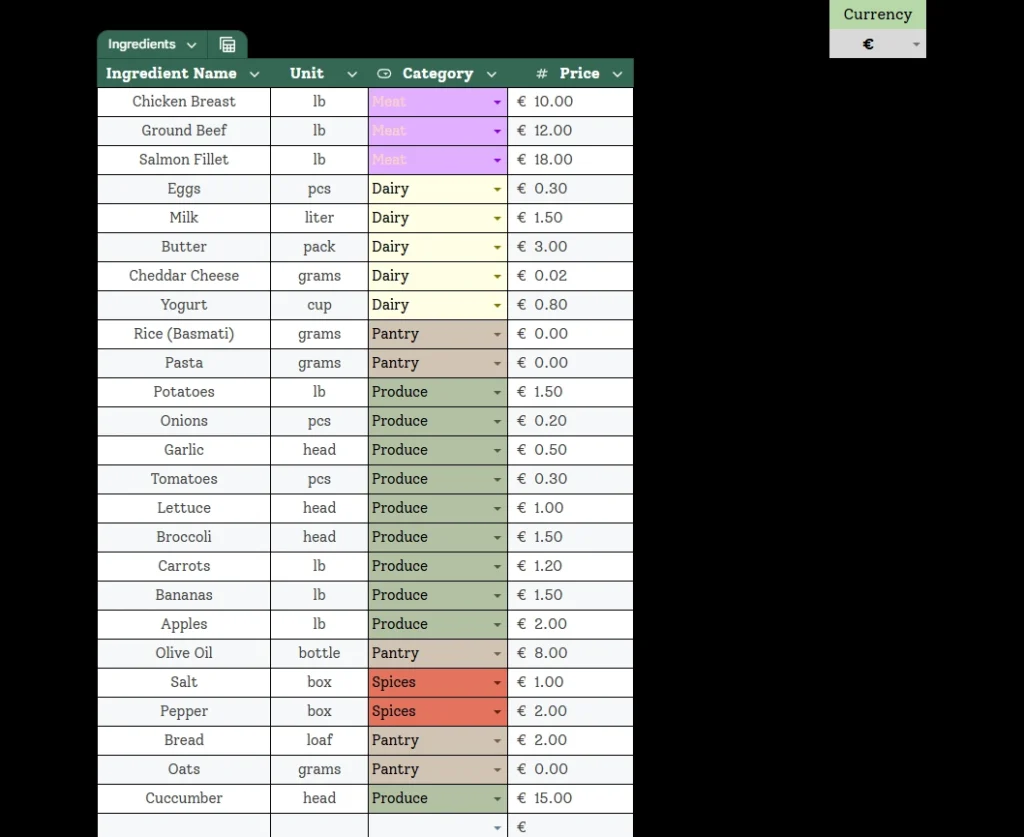
In this tab, I standardized every item I buy. You can see in the image above how strict the data structure is:
- Ingredient Name: (e.g., “Salmon Fillet”)
- Unit: (e.g., “lb” or “pcs”)
- Category: (Selected via Dropdown: Meat, Dairy, Produce)
- Price: (e.g., “€18.00”)
The Category column (colored in purple/green/yellow) is crucial. While it helps visually tag your items, its primary purpose is to feed the Financial Dashboard. It allows the weekly meal planner template to calculate exactly how much of your budget is going to “Snacks” versus “Real Food.”
Phase 2: The "Connector" (The Recipe Engine)
Now that we have our “Dishes” and our “Ingredients,” we need to link them. This is the Many-to-Many Relationship: One dish has many ingredients; one ingredient can be used in many dishes.
Tab 3: The Recipe Builder (“Recipes”)
This tab is the bridge. It connects the data.
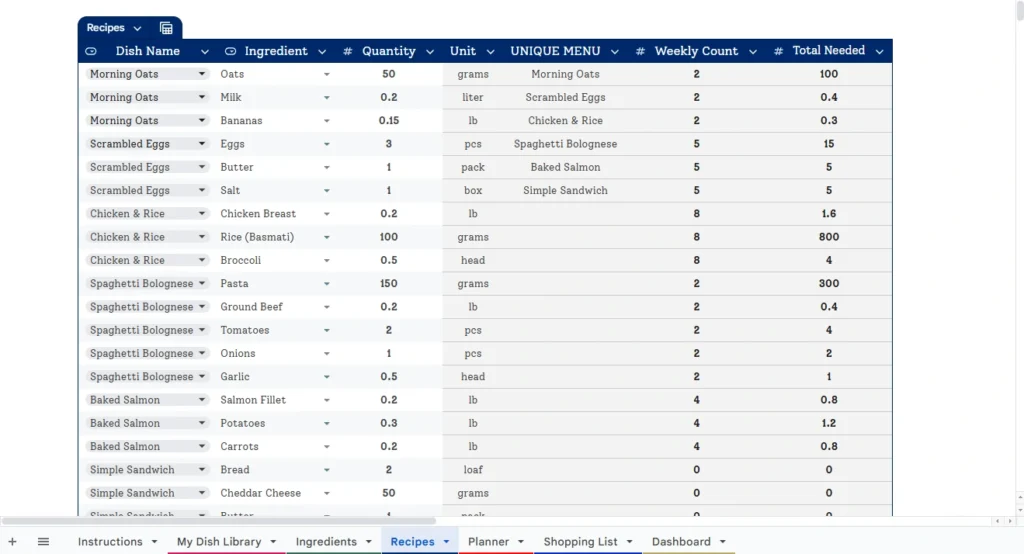
Here is how the logic flows, as seen in the screenshot:
- Dish Name: I select “Chicken & Rice” from a dropdown (sourced from Tab 1).
- Ingredients: I select “Chicken Breast,” “Rice,” and “Broccoli” from dropdowns (sourced from Tab 2).
- Automation: The moment I pick an ingredient, the “Unit” column auto-fills using a lookup formula. I don’t have to remember if I buy milk by the liter or gallon; the database remembers for me.
The “Unique Menu” Column You might notice a column called “UNIQUE MENU” in the middle of the screenshot. This is a technical necessity. Since a single meal (like “Scrambled Eggs”) takes up 3 rows of ingredients (Eggs, Butter, Salt), we can’t use this raw table for our planner dropdowns—otherwise, you’d see “Scrambled Eggs” listed 3 times.
I built a background filter in this column to extract only unique dish names, creating a clean, duplicate-free list for the Planner tab.
Phase 3: The "Frontend" (The Planner)
This is the only tab I interact with on a weekly basis. While the database runs in the background, this tab is the visual interface of the weekly meal planner template.
Tab 4: The Dynamic Planner (“Planner”)
This is designed to mimic a physical calendar but with the brain of a computer.

The Calendar Picker Logic: I hate manually typing dates like “Jan 5, Jan 6, Jan 7.” It’s tedious. In this sheet, I engineered a Dynamic Header System.
- There is a single cell (the orange one) with a “Calendar Picker.”
- I click it and select the Monday of the week (e.g., “5 Jan 2026”).
- The entire row of headers instantly updates to show the correct dates for that specific week (Tuesday Jan 6, Wednesday Jan 7, etc.).
The Selection Process: The cells for Breakfast, Lunch, and Dinner are dropdown menus linked to that “Unique Menu” list we built earlier.
- I select “Scrambled Eggs” for Monday Breakfast.
- I select “Baked Salmon” for Monday Dinner.
- The system immediately calculates the “Weekly Count” in the background, tallying how many times I plan to eat each dish.
Phase 4: The "Automation" (The Auto-Generated List)
This is the feature that justifies using a Weekly Meal Planner Template over a notepad. It eliminates the “Translation Layer” between your plan and your shopping list.
Tab 5: The Smart Shopping List (“Shopping List”)
Usually, even if you are using a printed weekly meal planner template, you have to sit down and write: “Okay, I need tacos twice, so I need double the meat.” This tab automates that math.
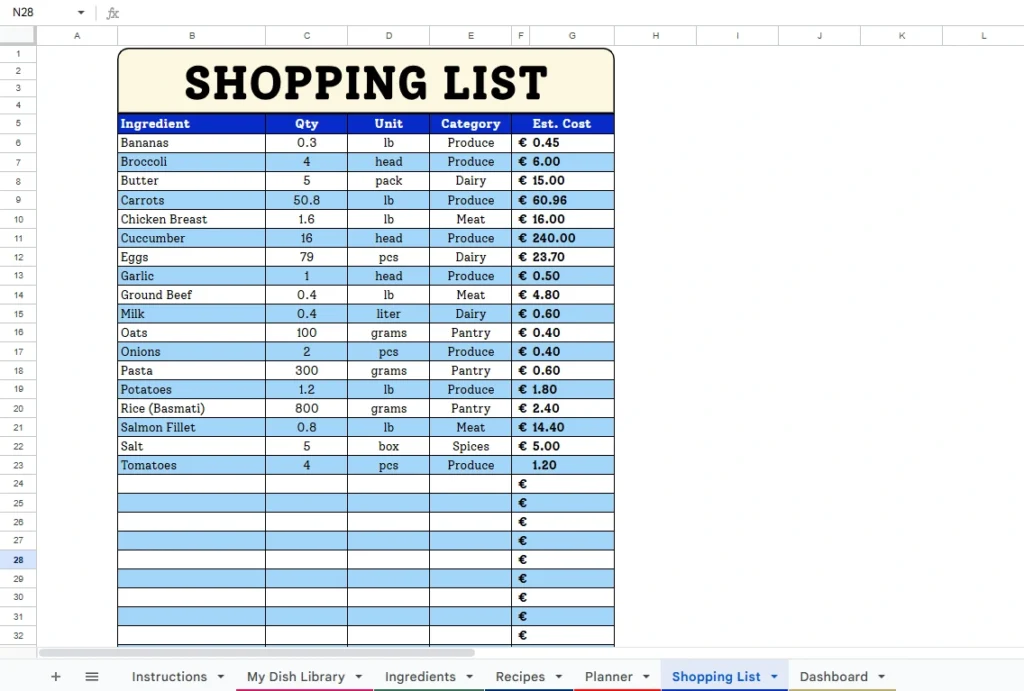
The Query Logic: Using a combination of QUERY and Array formulas, this tab scans the Planner and performs a “Consolidation Routine”:
- It sees you selected “Chicken & Rice” 8 times (as seen in the recipe tab count).
- It looks up the ingredients for Chicken & Rice.
- The Math: It multiplies the quantity by 8.
- The Price: It imports the live Est. Cost from the “Ingredients” tab.
The result is a consolidated list. Even if you eat eggs every morning, “Eggs” will only appear once on this list with the total required quantity sum (e.g., “12 eggs”). It tells you exactly what to buy and—crucially—how much it will cost.
Phase 5: The "Analytics" (The Financial Dashboard)
If you are trying to save money, tracking what you eat isn’t enough. You need to track the cost of what you eat.
Tab 6: The Dashboard (“Dashboard”)
This is the CEO view of your kitchen.
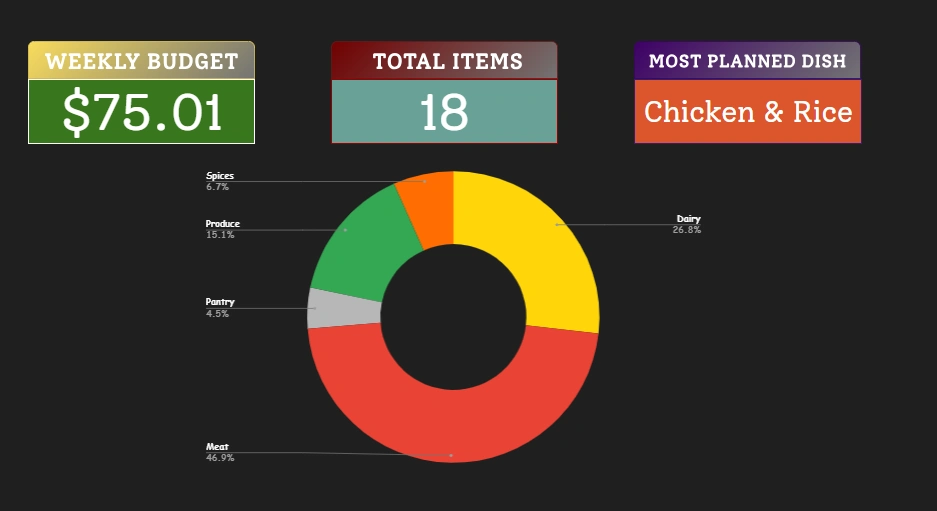
Most people go to the grocery store with a “vague idea” of their budget. This dashboard gives you hard numbers before you grab your keys.
- Card 1: Weekly Budget ($75.01): This sums the “Est. Cost” of every item on your generated shopping list. If your target is $60 and the card says $75, you know immediately that you need to swap the Salmon for a cheaper protein. You make the financial decision at home, not at the register.
- Card 2: Total Items (18): A quick count to check against your cart size.
- The Pie Chart: This visualizes your “Category” spend. In my screenshot, you can see that Meat (46.9%) and Dairy (26.8%) make up the bulk of the cost. This data is invaluable. If I need to save money, I know exactly where to cut.
The Workflow: A Sunday Routine
So, how does this actually look in practice? Here is my 5-minute Sunday routine:
- Open the Sheet: Go to the “Planner” tab and select next Monday’s date using the calendar picker.
- Clear & Select: The sheet is fresh. I use the dropdowns to fill in my dinners for the week. (I usually copy-paste my standard Breakfasts/Lunches to save time).
- Check the Dashboard: I click over to the Dashboard. Is the “Weekly Budget” under my limit? If yes, proceed. If no, I adjust one meal.
- Shop: I open the Google Sheets app on my phone. I go to the “Shopping List” tab. I check off items as I throw them in the cart.
Zero writing. Zero math. Zero friction.
Conclusion
The goal of this system isn’t just to organize recipes; it is to gain clarity.
When you treat your kitchen like a supply chain rather than a creative project, the chaos disappears. You are no longer guessing what you need or wondering where your money went. You have data.
By moving from static lists to a Weekly Meal Planner Template, you regain control over one of the most repetitive parts of your life. The spreadsheet doesn’t just store your plan; it actively helps you execute it within your financial means.
You can build this logic yourself using the structure outlined above (it’s a great way to master Google Sheets QUERY functions), or you can grab the “Smart Kitchen Template” here to start optimizing your grocery budget tonight.